Add/View Product Endpoint
Overview
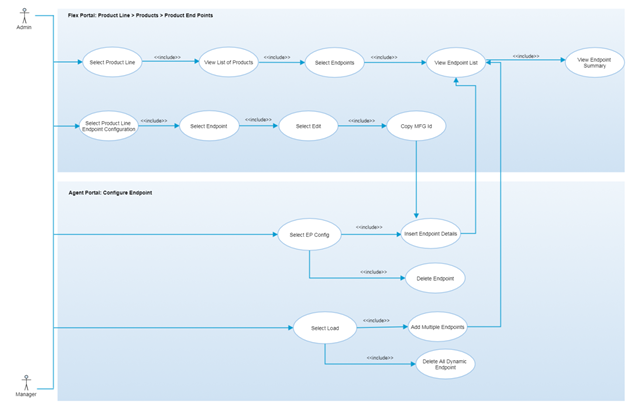
Endpoints are any hardware devices that can be used to measure some aspects of the real world. It is required to associate endpoints with any product to send and receive the endpoint data. Common types of data collected from the endpoints include temperatures, GPS coordinates, humidity, air pressure, etc.
Once endpoints are defined in the selected product line, authorized users are able to add dynamic endpoints for any product from the agent portal. Users can view endpoint information from each particular product’s endpoints list in the FlexConnect portal and can delete endpoints from Agent portal. Once any dynamic endpoint is added for the product, users will be able to view that endpoint information from the particular product’s endpoints list.
Step-by-Step Process
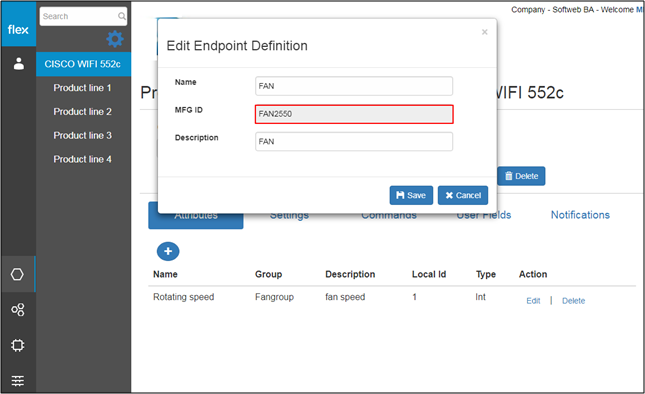
Step 1 – Check for the MFG ID
- Select any product line and click the “Configure” button
- Select any endpoint definition and click the “Edit” button
- This opens a pop-up that lists the “MFG ID”
Step 2 – Add Endpoint from Agent Portal
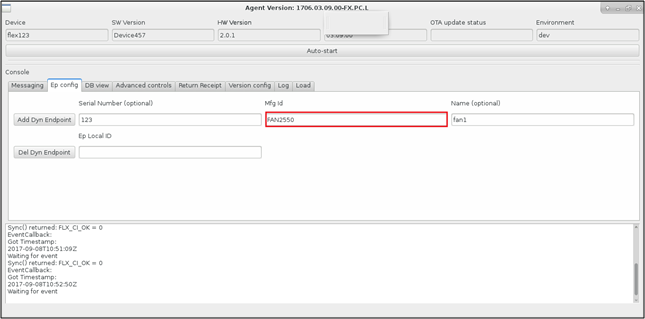
- Open the “Ep Config” tab from the agent portal
- Enter the following details in order to add a dynamic endpoint to the selected product:
Field | Type | Required? | Description |
|---|---|---|---|
Serial Number | Text Box | No | This field requires endpoint’s unique ID. |
Mfg Id | Text Box | Yes | This field requires the endpoint’s Mfg Id. (Check for “MFG ID” as mentioned in step-1) |
Name | Textbox | No | This field requires the name of the endpoint. |
- Click the “Add Dyn Endpoint” button
- The agent portal will notify the user with either a success or error message
- If the user sees a success message, they can continue to Step 3
- The agent portal will notify the user with either a success or error message
Notes
- Product must be active and connected in order to add dynamic endpoint.
Step 3 – View Endpoint in Agent Portal

- Click the “Endpoints” button of the product for which you have added the endpoint from Agent portal
- This displays the list of all added endpoints for that particular product
- Users can search and filter endpoints using the following options:
- Search by Text
- Filter by Start date and Start time stamp
- Filter by End date and End time stamp
- Clear Filter Button
- This can be used to clear the applied filters
- Back Button
- This can be used to return to the “View Products” page
- Users are able to view the following details in list of endpoints:
- Endpoint name
- Click the Down Arrow icon to sort the endpoints list in ascending order by endpoint name
- Click the Up Arrow icon to sort the endpoints list in descending order by endpoint name
- MFG ID (Manufacture ID)
- Click the Down Arrow icon to sort the endpoints list in ascending order by Manufacture ID
- Click the Up Arrow icon to sort the endpoints list in descending order by Manufacture ID
- Serial Number: Unique serial number associated with it
- Click the Down Arrow icon to sort the endpoints list in ascending order by Serial Number
- Click the Up Arrow icon to sort the endpoints list in descending order by Serial Number
- Status (Active or not)
- Last Updated date
- Click the Down Arrow icon to sort the endpoints list in ascending order by Last Updated Date
- Click the Up Arrow icon to sort the endpoints list in descending order by Last Updated Date
- Endpoint name
- By selecting any endpoint from the list, users are navigated to the “Summary Page” of that particular endpoint (Refer to Step 4)
Step 4 – View Endpoint - Summary Page
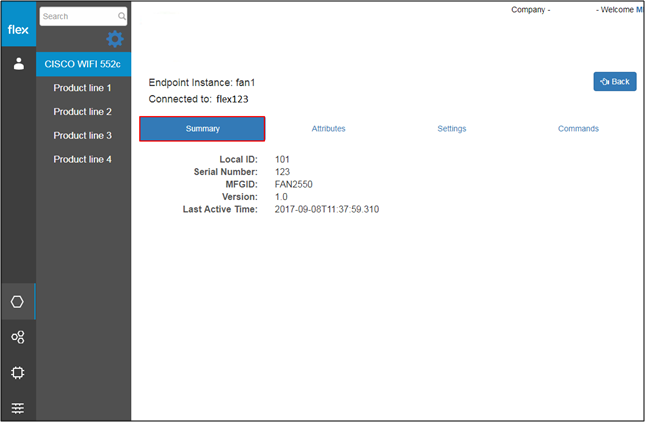
- Select any endpoint from the selected Product Endpoint list
- Users can view the Endpoint name and connected product name at the top of the summary page
- The Endpoint "Summary" tab contains the following information:
- Local Id
- Serial Number
- MFGID
- Version
- Last active time
Notes
- The other tabs in the product details "View" endpoint page are described in upcoming instruction pages.
Step 5 – Delete Endpoint from Agent Portal
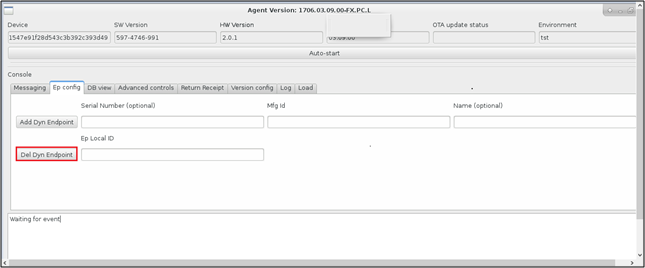
- Select the “Ep config” tab from the agent portal
- Insert the EP local ID in the textbox
- Users can view the local id using two ways:
- Agent Portal
- Open “DB view” tab
- Open “Endpoints” tab
- View Ep ID in first column
- Flex Portal
- Open “View Endpoint - Summary Page” of any particular endpoint (Refer to Step 4)
- Users can see the Local Id for the endpoint from this page
- Agent Portal
- Users can view the local id using two ways:
- Click the “Del Dyn Endpoint” button
- The agent portal will notify the user with a success or failure message
- If the system notifies the user with a success message, the endpoint will be deleted from that particular product
Step 6 – Create Multiple Dynamic End Points from the Agent Portal
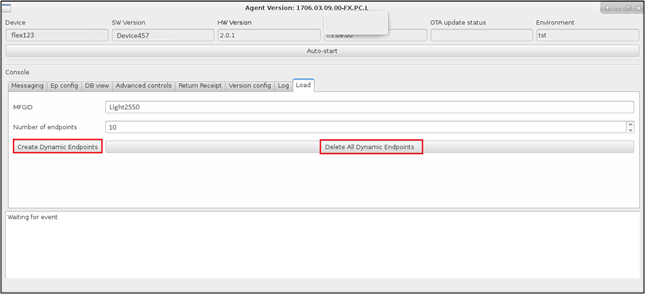
- Select the “Load” tab from the agent portal
- This allows users to create a bulk number of endpoints with the same MFGID in single click
- Insert the following details:
- MFGID
- Number of Endpoints
- Click the “Create Dynamic Endpoints” button
- Users will be able to see multiple dynamic endpoints from the Flex portal
Step 7 – View Dynamic Endpoints in Flex Portal
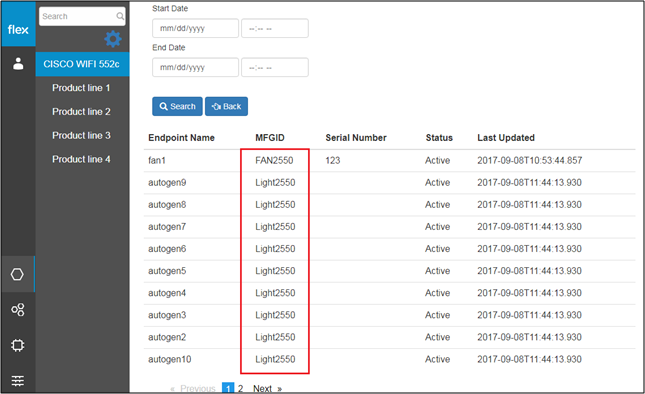
- Select a product line from the left navigation panel
- Select a product from the list of products available
- Click the “Endpoints” button
- This opens a list of dynamic endpoints
- Users can view the list of endpoints with the following details:
- Endpoint name
- MFGID
- Serial Number
- Status
- Last Updated
- Users can view the list of endpoints with the following details:
- This opens a list of dynamic endpoints