Maintain Users (Admin, Installer, Manager, User, Viewer)
Overview
A user is an entity that has authority to use the FlexConnect portal based on their assigned role. FlexConnect has multiple user roles including Administrator, Installer, Manager, User and Viewer.
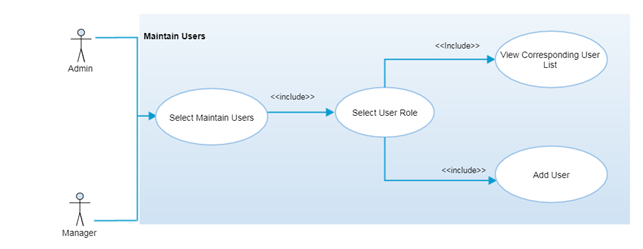
Authorized users are able to view the full list of users by user role and add new users by selecting “Maintain Users” menu option from the left navigation panel. This feature is required to create and maintain role wise users.
Step-by-Step Process
Step 1 – View User List
- Select the
 icon then the “Maintain Users” menu option from the left navigation panel
 - Users are redirected to a new page containing a list of the types of user roles in the left navigation menu
- From this page, users can access the following options:
- Search User Role
- Users can search for a user role from the list of already added user roles
- The system can filter the list of user roles based on any inserted keyword
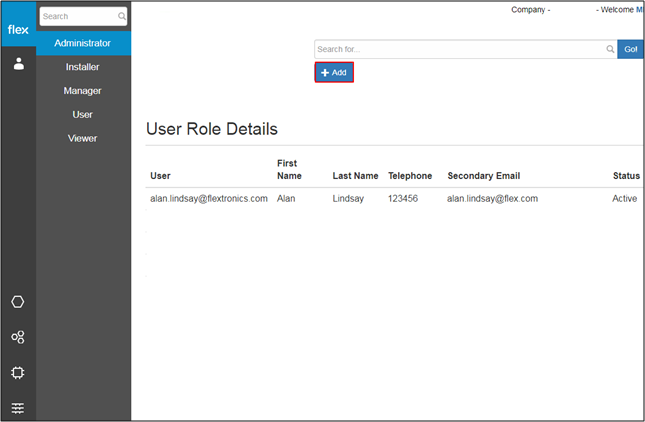
- User Role List
- Select the desired user role to view the list of users
- The list is displayed with the following details:
- User
- First Name
- Last Name
- Telephone
- Secondary Email
- Status
- Users can select any user from the list to view, edit and delete that user’s profile
- This navigates users to the “View Profile” screen
- Add Button
- Click the “Add” button to add a new user
- This navigates users to the “Add User” page (Refer to Step 2)
- Search User Role
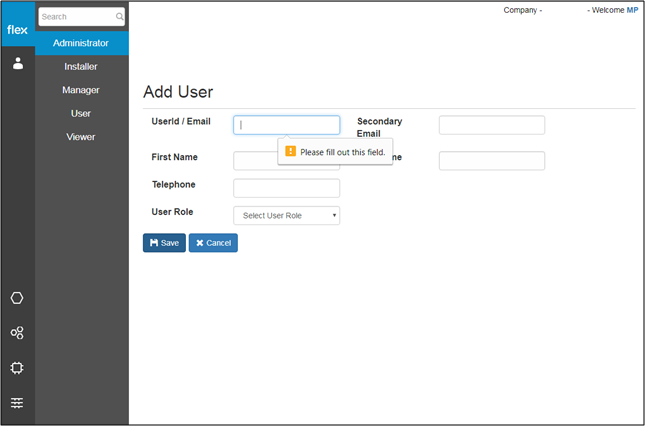
Step 2 – Add User
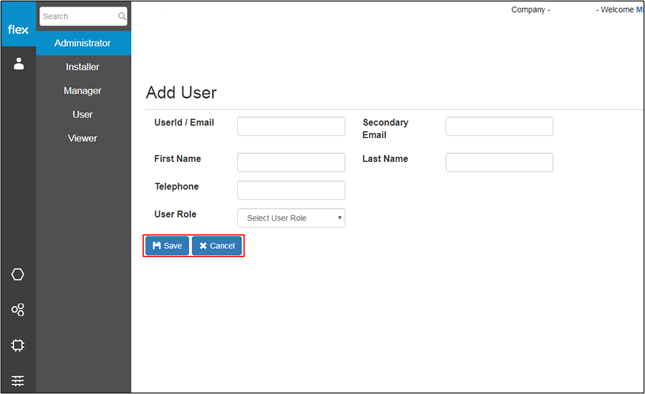
- Enter the following details to add a new user:
Field | Type | Required? | Description |
|---|---|---|---|
User ID/Email | Text Box | Yes | This field requires unique user ID or Email Id for each new user |
Secondary Email | Text Box | Yes | User can add secondary email from this field |
First Name | Text Box | Yes | It requires you to enter the first name of the user |
Last Name | Text Box | Yes | It requires you to enter the last name of the user |
Telephone | Text Box | Yes | It requires you to enter the telephone number of the user |
User Role | Drop down | Yes | Select the user role from the drop down list to assign it to new user |
- Click “Cancel” to go back without saving information
- Click the “Save” button to add the new user, it will check for below validations
- The new product line information is validated after the user clicks the “Save” button
- If proper values are inserted into all required fields, the following will occur:
- The system will notify the user with a success message “User field Added successfully”
- The users are redirected back to the “View User List” (Refer to Step 1)
- The user will be notified with a proper error message in the event of:
- If the user needs to enter any field level information
- If proper values are inserted into all required fields, the following will occur:
- The new product line information is validated after the user clicks the “Save” button