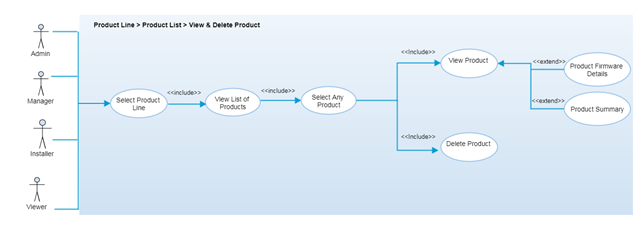
View & Delete Products
Overview
A product is the actual device that can translate and communicate data & activity from native hardware. It can be a router, plug, etc. devices that can connect with cloud for data communication. After importing products, authorized users will be able to view the full list of products and can click on any product to view its details.
Once the product has been added, authorized users can view the list of added products, view product summary and firmware details of selected product and delete the product. Products are required to translate and communicate data & activity from native hardware.
Step-by-Step Process
Step 1 – View Products List
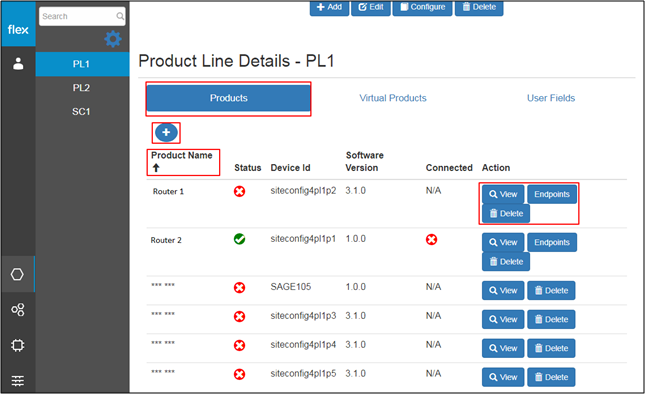
- Click on any product line from the left navigation panel to view the list of products
- The user can view the following details of each product in the product line:
- Product Name
- Click the down arrow icon to sort the product list in ascending order by product name
- Click the up arrow icon to sort the product list in descending order by product name
- Status: Active or Inactive
- By default, products will be in inactive mode (red circle with white 'x')
- Products can be activated using agent interface
- Device Id
- Click the down arrow icon to sort the product list in ascending order by Device Id
- Click the up arrow icon to sort the product list in descending order by Device Id
- Software Version
- Click the down arrow icon to sort the product list in ascending order by software version
- Click the up arrow icon to sort the product list in descending order by software version
- Connected Status
- This shows whether product is connected or not
- A red circle with a white 'x' indicates the product is not connected
- A green circle with a white checkmark indicates the product is connected
- N/A indicates that the prodcut has an inactive status
- View Button
- This navigates user to the ‘View Product Summary” page (Refer to Step 3)
- Endpoints
- This navigates user to the “View Product End Points” page
- Delete
- This navigates users to the “Delete Product” page (Refer to Step 2)
- Product Name
- Click the “+” button to add/import new products
- This navigates user to the “Add (Import) Product” page
Step 2 – Delete Product
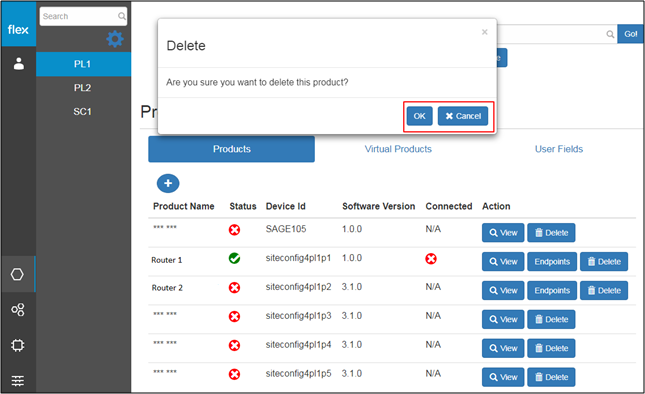
- Click the “Delete” button for any product to delete it
- This opens a pop-up with a confirmation message
- Click “OK” to delete the product, and it will be deleted from the product list
- Click “Cancel” to go back without deleting the product
- This opens a pop-up with a confirmation message
Step 3 – View Product Summary
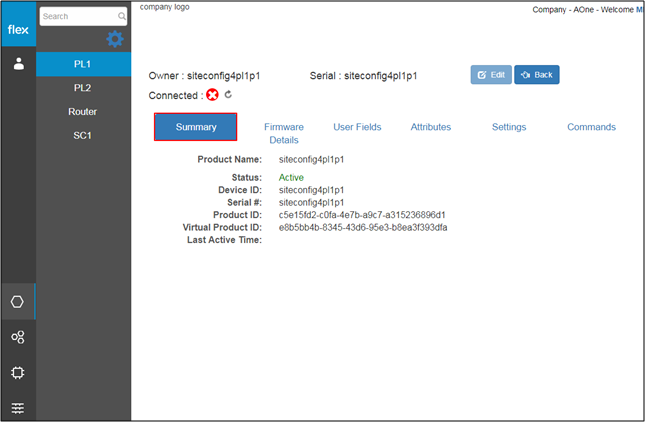
- Click the “View” option for any product from the “View Products list” page (Refer to Step 1)
- This will open the “Summary” tab by default
- Here, users can view the owner information and the serial number of product on top of the product details page
- Back Button
- This navigates users back to the “View Products List” page
- The product summary tab contains the following information:
- Product Name
- Status
- Active if product is activated
- Inactive if product is deactivated
- Device ID
- Serial Number
- Product ID
- Virtual Product ID
- Last Active Time
Step 4 – View Product Firmware Details
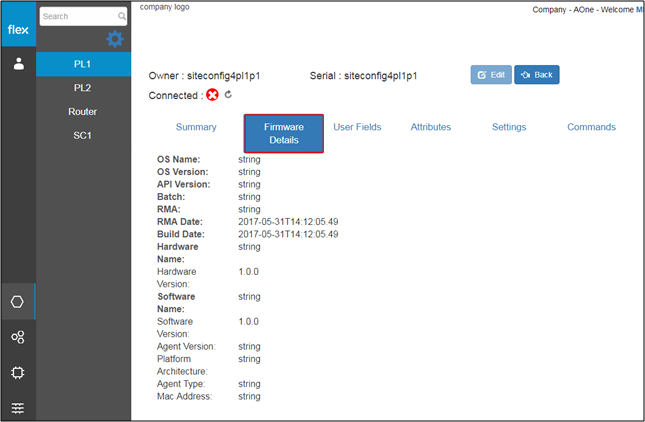
- Click the “View” option for any product from the “View Products list” page (Refer to Step 1)
- This will open the “Summary” tab by default
- Click the “Firmware Details” tab to view the following details:
- OS Name
- OS Version
- API Version
- Batch
- RMA
- RMA Date
- Build Date
- Hardware Name
- Hardware Version
- Software Name
- Software Version
- Agent Version
- Platform Architecture
- Agent Type
- Mac Address
Note: The other tabs in the product details "View" page are described in upcoming instruction pages.