Configure Product/Endpoint - Notifications
Overview
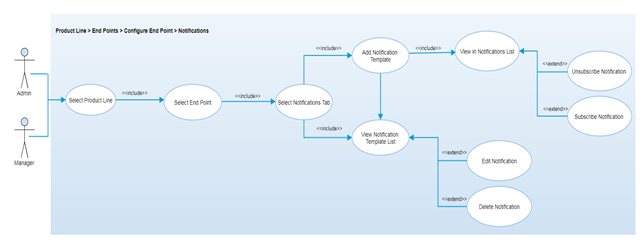
Notifications are used to manage alerts for users based on the event action and role level along with alert severity for any product/endpoint. Authorized users can subscribe for the specific notification templates in order to get the alerts on specific events.
Once the endpoint of any product line is created, authorized user can add notification template/definition for that particular endpoint. Authorized users are able to select the configure endpoint option from any product line and can view/add/edit/delete the notification template/definition for that particular endpoint from the “Notifications” tab. It is required to add the notification template so that user can set alerts settings, event action, users and delivery method.
Step-by-Step Process
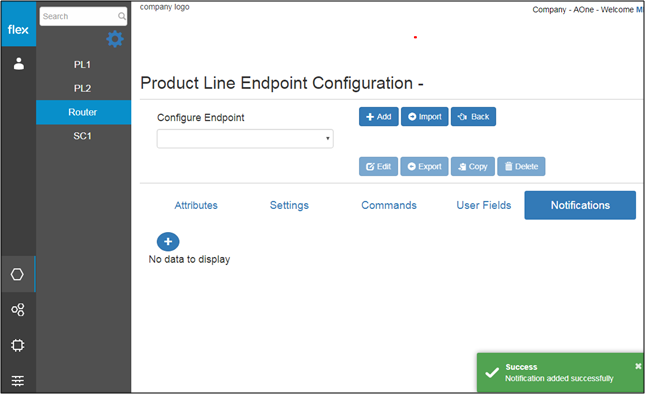
Step 1 – Notifications
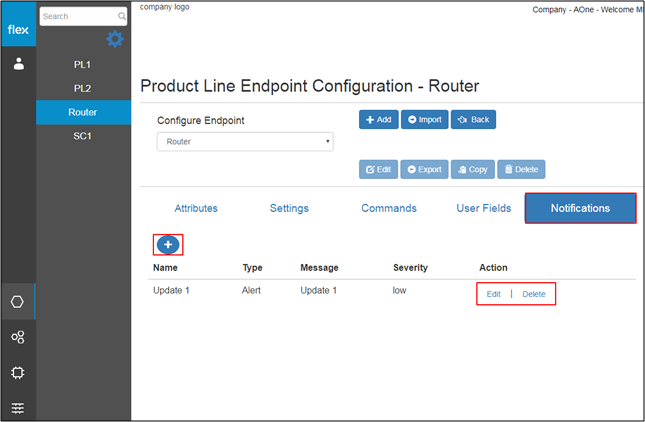
- Select any endpoint from the “Configure Endpoint” drop down for any particular product line
- Select the notification tab. It will show the following details about the already added notification templates for the selected end point:
- Name
- Unique name
- Type
- Type of the notification
- Message
- Message which will be sent as an alert notification
- Severity
- Low/Medium/High
- Edit
- This navigates users to the “Edit Notifications” page (Refer to Step 3)
- Delete
- This navigates users to the “Delete Notifications” page (Refer to Step 4)
- Click the “+” button to add new notification template
- This navigates users to the “Add notification” page (Refer to Step 2)
- Name
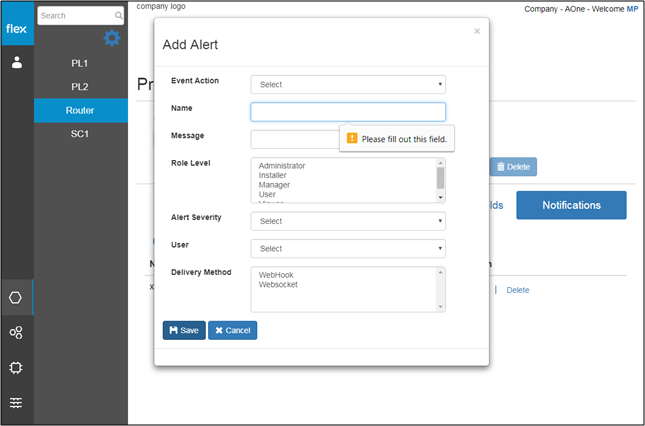
Step 2 – Add Notification/Alert
Preconditions: Click the “+” button to add new notification template
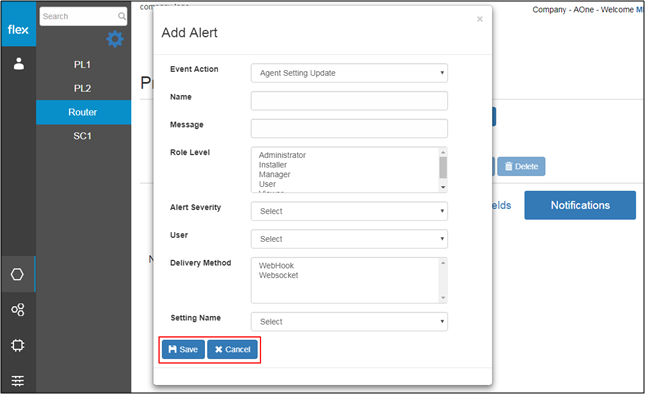
- The user will need to choose the type of "Event Action" for the notification from the dropdown menu
- If the user selects “Agent Setting Update”, the following details need to be entered to add an alert:
Field | Type | Required? | Description |
|---|---|---|---|
Event Action | Drop Down | Yes | Requires an event action to be selected |
Name | Text Box | Yes | Requires a unique name for the alert notification |
Message | Text Box | Yes | Requires message which will be send as an alert notification |
Role Level | List box | Yes | Requires user to select role level(s) from the List box |
Alert Severity | Drop Down | Yes | Requires user to select alert severity from the drop down list |
User | Drop Down | Yes | Allows you to select any individual user or all users for this alert notification |
Delivery Method | List box | Yes | Allows you to select multiple delivery methods from the list Users have two options to receive Notification: i) WebSocket ii) WebHook |
Setting Name | Drop Down | Yes | Allows you to select the setting for which you want to set the alert Drop down will contain list of settings for selected endpoint |
- If the user selects “Attribute Output”, the following details need to be entered to add an alert:

Field | Type | Required? | Description |
|---|---|---|---|
Event Action | Drop Down | Yes | Requires an event action to be selected |
Name | Text Box | Yes | Requires unique name for the alert notification. |
Message | Text Box | Yes | Requires message which will be send as an alert notification. |
Role Level | List box | Yes | Requires you to select role level(s) from the List box. |
Alert Severity | Drop Down | Yes | Requires you to select alert severity from the drop down list. |
User | Drop Down | Yes | Allows you to select any individual user or all users for this alert notification. |
Delivery Method | List box | Yes | Allows you to select multiple delivery methods from the list. Users have two options to receive Notification: i) WebSocket ii) WebHook |
Attribute Name | Drop Down | No | It allows you to select the attribute for which you want to set the alert. Drop down will contain list of attributes for the selected endpoint. |
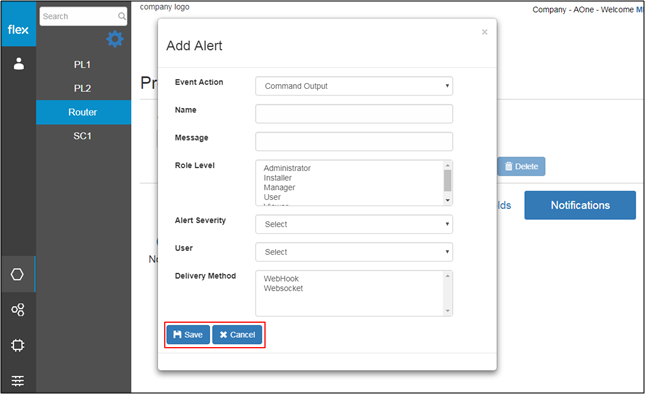
- If the user selects any event action other than “Attribute Output” and “Agent Setting Update”, the following details need to be entered to add an alert:
Field | Type | Required? | Description |
|---|---|---|---|
Event Action | Drop Down | Yes | This field is requires to choose event action.
|
Name | Text Box | Yes | This field requires unique name for the alert notification. |
Message | Text Box | Yes | This field requires message which will be send as an alert notification. |
Role Level | Drop Down | Yes | It requires you to select role level from the drop down list. |
Alert Severity | Drop Down | Yes | It requires you to select alert severity from the drop down list. |
User | Drop Down | Yes | It allows you to select any individual user or all users for this alert notification. |
Delivery Method | List box | Yes | It allows you to select multiple delivery methods from the list. Users have two options to receive Notification: i) WebSocket ii) WebHook |
- Click "Cancel” to go back to the “Notifications” page without saving the notification details
- Click “Save” to save the notification template
- The alert information is validated after the user clicks the “Save” button
- If proper values are inserted into all required fields, the following will occur:
- The system will notify the user with a success message. (“Alert Added successfully”) and user will be redirected back to the “Notifications” page
- The user will be notified with proper error messages (will appear in the bottom right-hand corner of the screen) in the event of:
- If the user needs to enter any field level information
Step 3 – Edit Notification/Alert
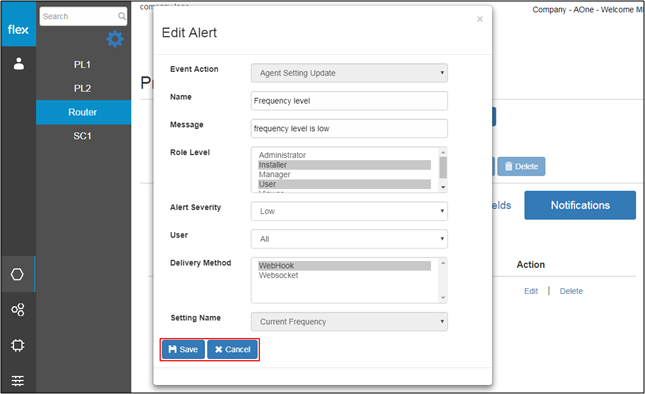
- Click the “Edit” button from the “Notifications” list. Users will be able to edit the following details of selected notification/alert:
- Name
- Message
- Role Level
- Alert Severity
- User
- Delivery Method
- Click the “Save” button to save the edited notification details
- The alert information is validated and the system will notify user if any errors occur
- Click “Cancel” to go back to the “Notifications” page without editing any information
Step 4 – Delete Notification
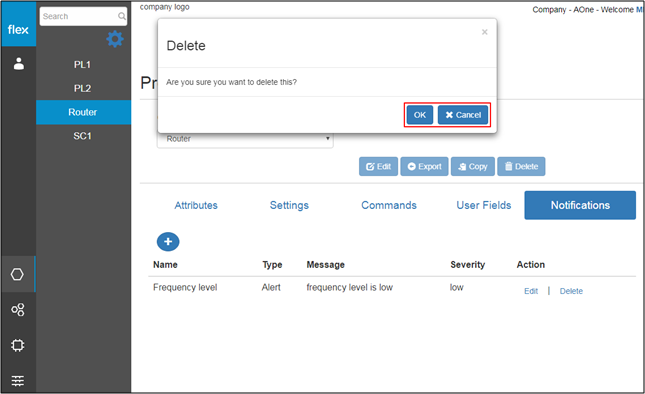
- Select any Notification/alert from the list
- Click “Cancel” to go back to “Notifications” page without deleting the notification
- Click “Delete” to delete the notification template
- A pop-up opens with a confirmation message
- When the user clicks “OK” to delete the alert details, the alert will be deleted from the list and the user will be notified with a success message (“Notification deleted successfully”).
- A pop-up opens with a confirmation message
Notes:
- If the “Individual” user option is selected as a delivery method then every user based on their selected role level has to subscribe this notification in order to get an alert in the notification section.
- If the “All” user option is selected as a delivery method then the alert will automatically notify all users based on their selected role level.