Manage Product Lines
Overview
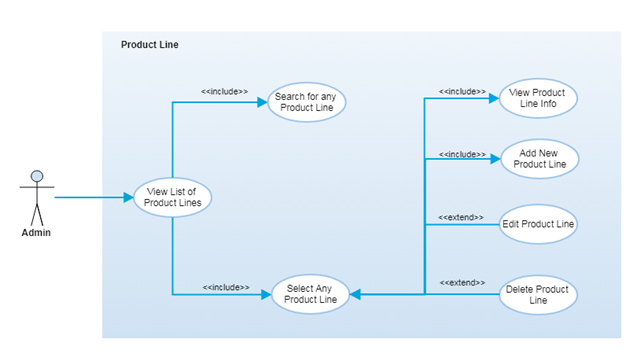
A product line is a group of related products under a single brand sold by the same manufacturer or products having the same type of configurations.
After a successful login, authorized users can select “Product Line” tab from the menu navigation and can configure product line information. Product lines can be managed view/add/edit/delete.
Step-by-Step Process
Step 1 – Product Line List
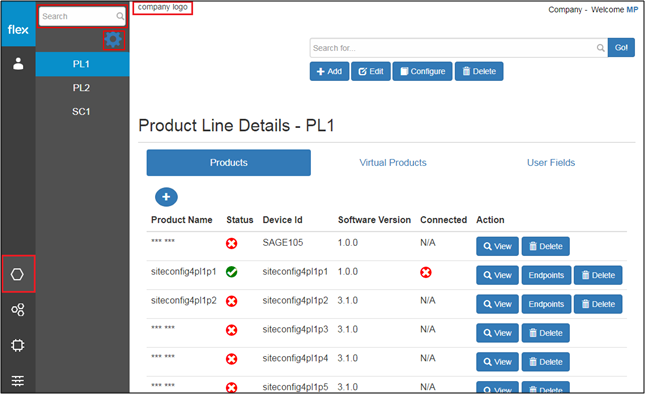
- The “Product Line List” page is the default landing page
- It shows the logo of the company you are currently accessing
- If the user is associated with only one company, this page is accessed directly from the login page
- From the inner left navigation panel, the user can view the following information:
- Main Menu Navigation
- Product Line List
- The user can see the list of already added product lines with the product line name
- By clicking on any product line, it navigates user to the ‘View Product Line Details” page (Refer Step 2)
- Search Product Line
- The user can search for a particular product line from the list of already added product lines
- By entering any keyword, the system can filter the product lines based on the inserted keyword
- Configure Product Line
- It navigates user to the “Configure Product Line” page (Refer to the Configure Product / Endpoint instructions)
Step 2 – View Product Line Details
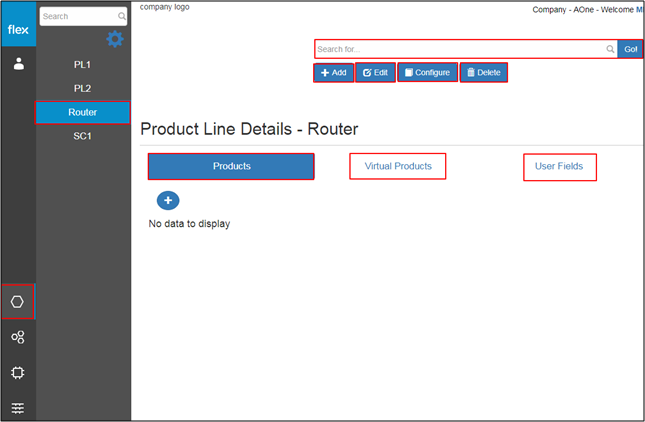
- After selecting a specific product line, the user can access the following options at the top of the Product line details page:
- Search Bar
- The user can search for a particular product within the selected product line from from the list of already added products
- By entering any keyword, the system can filter the products based on the inserted keyword
- "Add" Button (Refer to Step 3)
- By selecting this button, the user can add a product line to the product lines listed
- This navigates the user to the “Add Product Line” page
- "Edit" Button (Refer to Step 4)
- By selecting this button, the user can edit the details the selected product line
- This navigates the user to the “Edit Product Line” page
- "Configure" Button (Refer to the Configure Product / Endpoint instructions)
- By selecting this button, the user can configure the product line endpoint
- This navigates the user to the “Product End Points” page
- "Delete" Button (Refer to Step 5)
- By selecting this button, the user can delete the selected product line from the product lines listed
- Search Bar
- User can see the below details for selected product line:
- "Products" (Default Tab)
- The user can view the list of products added under the selected product line
- "Virtual Products" Tab
- The user can view list of virtual products added under the selected product line
- "User Fields" Tab
- The user can view list of user fields added under the selected product line (Refer to Step 5)
- "Products" (Default Tab)
Step 3 – "Add" Product Line
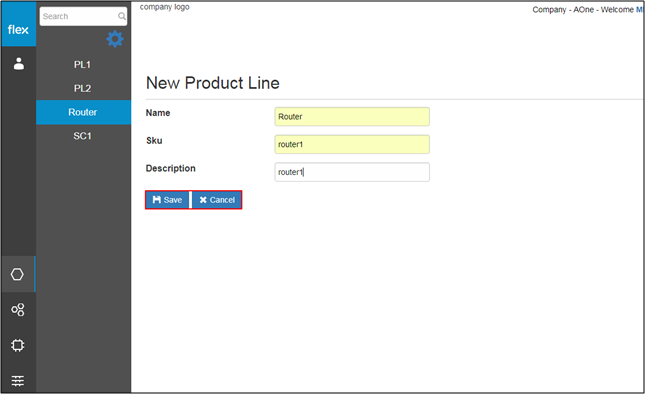
Precondition: Selecting the Add button on the Product Line Details page
- From the New Product Line page, the user can enter the following details to add new product line:
- Name
- This field is required
- Enter a unique name for the new product line
- SKU (Stock Keeping Unit)
- This field is required
- Enter a unique value for the product SKU
- Description
- This field is not required
- Enter a brief description about the product line
- Name
- Click the “Cancel” button to go back to “View Product Line details” page without saving any information
- Click the “Save” button to save the new product line information
- The new product line information is validated after the user clicks the “Save” button
- If proper values are inserted into all required fields, the following will occur:
- The system will notify the user with a success message “Product Line Added Successfully”
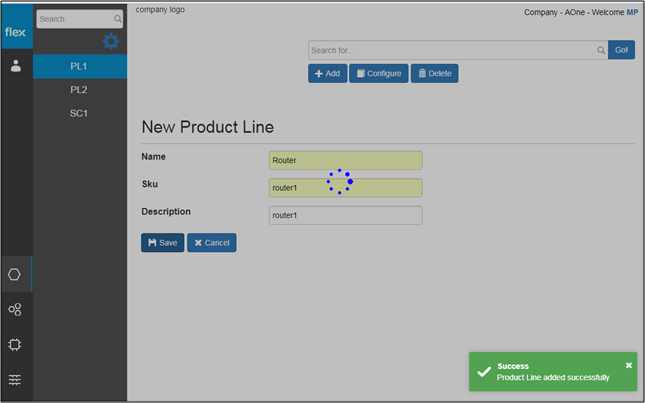
- The user is then redirected to the “View Product Line Details” page. (Refer back to Step 2)
- The user will be notified with proper error messages in the event of:
- If the user needs to enter any field level information
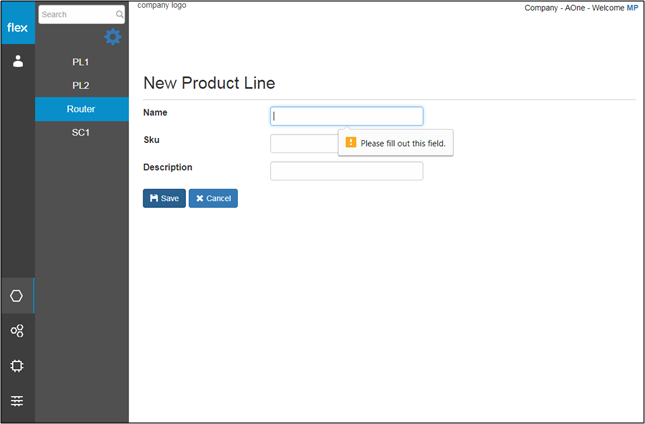
- If the user needs to enter any field level information
- If the user enters a duplicate product line name

- If the user enters a duplicate product line name
- If the user enters a duplicate SKU
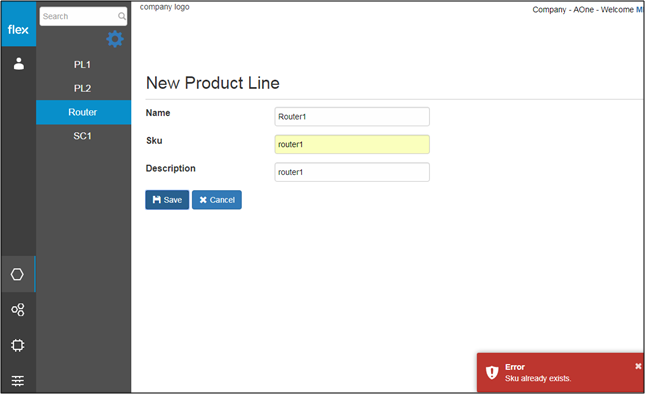
- If the user enters a duplicate SKU
Step 4 – Edit Product Line
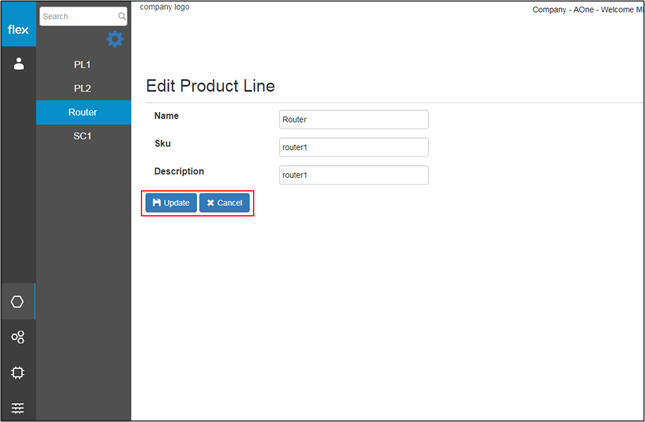
Precondition: Selecting the Edit button on the Product Line Details page
- From the New Product Line page, the user can edit the following details of the product line:
- Name: Name of the selected product line
- Sku: Stock keeping unit
- Description: Description of the selected product line
- To save the edited information, the user can select the “Update” button
- System will validate the updated information and notify user in case of any error (Refer back to Step 3)
- Selecting the “Cancel” button will navigate the user back to the Product Line Details page without changing any information
Step 5 – Delete Product Line
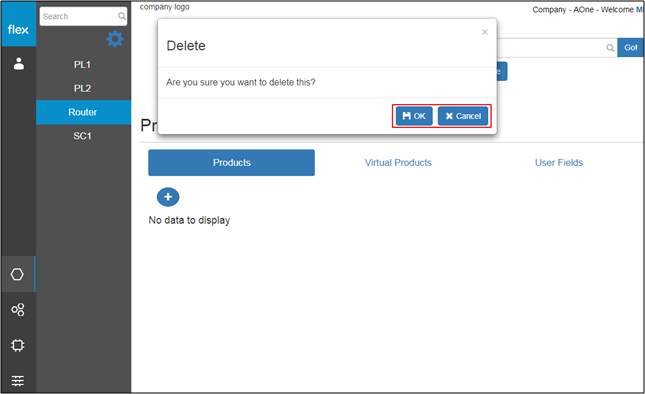
Precondition: From the Product Line Details page, the user must select the desired product line from the list
- By selecting the “Delete” button, the user can delete the selected product line
- A pop-up appears with a confirmation message
- Click on “Cancel” to go back without deleting the product line
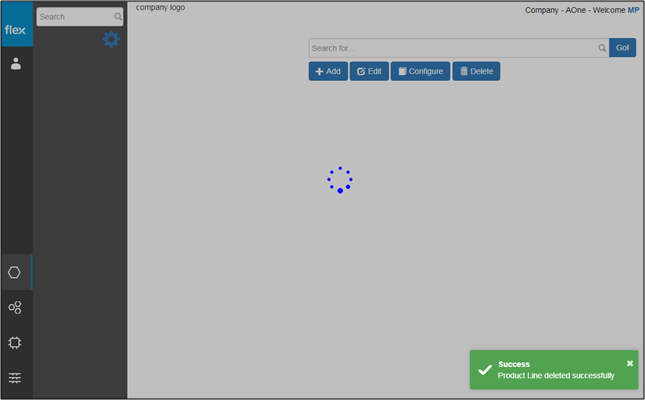
- By clicking the “OK” button, the user will delete the product line
- The product line will be deleted from the product line list
- The system will notify the user with a success message as shown below (“Product Line Deleted Successfully”)
-
- A pop-up appears with a confirmation message